Assembly instructions filter HMF (Hamburger Matten Filter) with air lifter and pressure can: Today we want to give you some tips on how to create one filtering for build several aquariums yourself can. These questions are asked again and again in forums. Is there any way to run multiple aquariums with one filter? How can one airlift build for multiple aquariums? What is an HMF? How are breeding facilities filtered? How does a Hamburg mat filter? You will be able to answer these and other questions yourself after reading this article.

What is an air lifter and how does it work?
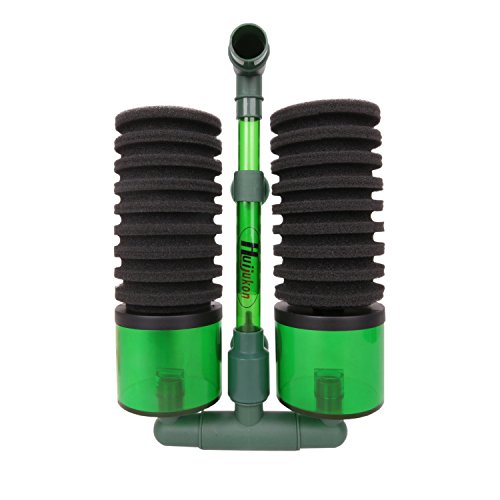
Basically, it is not about a single filter, but rather about the possibility of operating a filter in each aquarium, which is operated from a central system. As already presented in our guide to aquarium filtration, the Hamburg mat filters are particularly suitable for breeding systems. They are quick to set up and also offer the option of a common central supply of air. This is where the air lifter comes into play.
With the help of the air, water is drawn through the mat filter by means of a negative pressure and the water is thus filtered. We have also attached some pictures to illustrate this. You can also find a video about it.
Air is fed into a tube in the lower part. This air rises and sucks in water from below. This water rises up the pipe and then escapes again at the top with a bottom on the other side of the filter mat. This tube sits between the disc and the filter mat and the outlet of the tube is on the other side and thus goes back into the pool. This creates a cycle and the water is cleaned by the mat filter. The filter mat or the filter medium can have different perforations. This is given in PPI and is usually PPI 10 (coarse) in heavily occupied tanks and PPI 20 (fine) in tanks that are rather sparsely occupied. Depending on how finely you want or need to filter.
Of course, you can also build the air lifter with a filter cartridge at the end of the pipe or buy it ready-made. It doesn't always have to be a whole filter mat like a Hamburg mat filter. You can find out exactly what such a filter looks like in our guide to filter technology.
The filtering options in the aquarium


Build your own air lift
Of course you can do one too Build your own air lift. This is pretty easy. You take a pipe and a bow. The diameter of the pipe is individually tailored to needs such as the size of the aquarium and the performance of the compressor or the air pump to adjust. Drill a hole at the lower end of the pipe and put the hose for the air supply in there. Basically that's it. Of course, this model can still be refined considerably. Several fine holes and a bandage for the air intake, to name just one example. But more on that in another article. This is supposed to be about the central system.
Anyway, here's a video.
How is the structure of such a central system now? How do I build such a pressure can?
But now we come to the actual topic, a central supply of several aquariums with air, so that only the air lifter has to be installed in each tank. A few components are required for this.
What components do I need for the filtering and the pressure can?
- Air lift for each pool. Either buy it or make it yourself
- Air hose mostly made of silicone from the air lifter to the central unit
- Sewage pipe with a diameter of 50 mm and a length of 1 - 2 meters, actual pressure box
- Two end caps for the sewage pipe
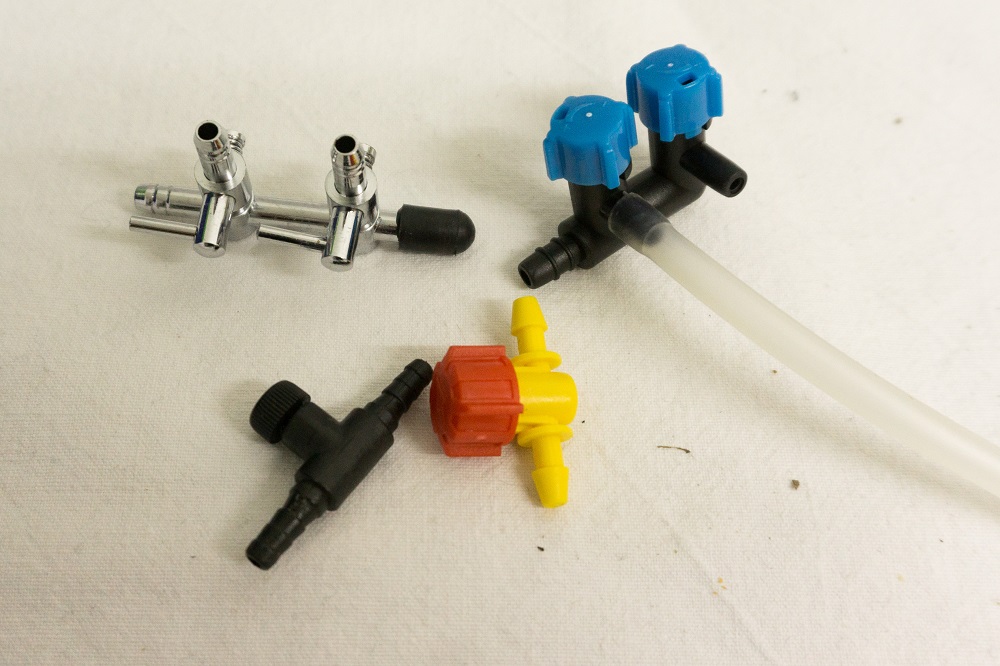
- Manifolds or shut-off valves for the individual air lifters
- Air nipple for the large distribution pipe as an outlet to the individual aquariums
- Possibly two-fold distributor to always regulate two pools
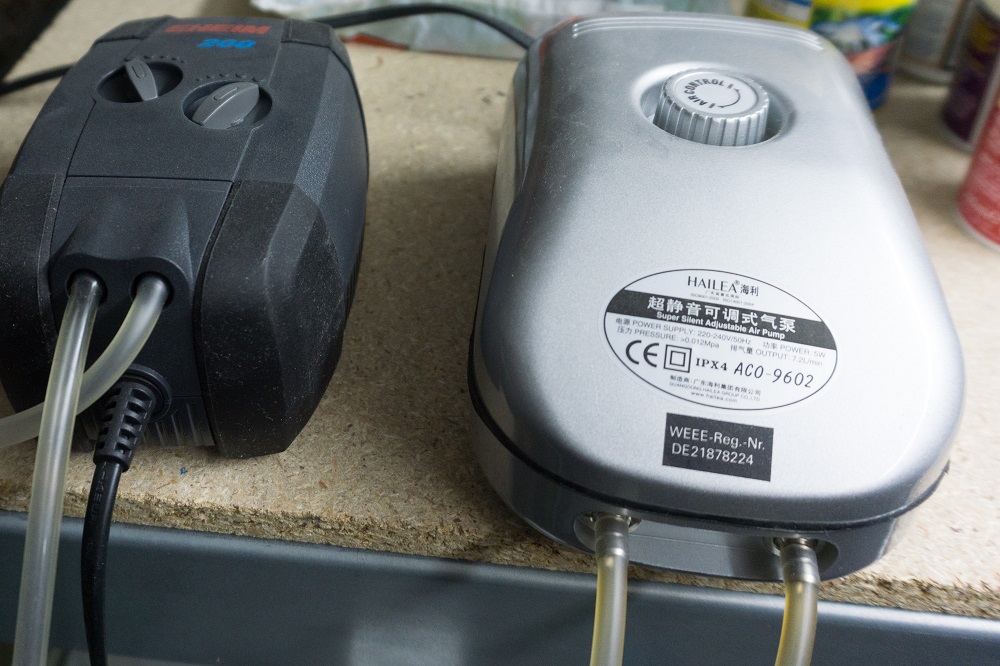
- Compressor / piston compressor or membrane pump in individual sizes
Assembly instructions for the collecting pipe/pressure box and the function
Basically, it's about supplying many aquariums with air via a large collecting pipe and using it to operate the air lift and the mat filter. Otherwise you would have to install a separate diaphragm pump for each aquarium. With our solution, only one compressor or only one air generator is required and, depending on the output, many pools can be operated with it.
Step 1: Preparing the sewer pipe
You take the sewer pipe and cut it to your desired length. However, we do not recommend making it smaller than one meter. Then the end caps are put on. These should close the pipe tightly and also hold it in the event of back pressure. If necessary, you can glue them in place with hot glue. In most cases, however, the seal is sufficient to withstand pressure.
Step 2: Attaching the Air Supply
Here you take the silicone hose and connect it to the compressor on one side. Of course, several compressors can also be used here. Depending on whether you want to buy a large one or perhaps have smaller ones available. The silicone hose is connected to the water pipe on the other side. We routed this into one of the end caps. The air nipples are required for this. This can be screwed into the tube. You have to pre-drill according to size beforehand. Here, too, one must pay attention to tightness. Of course you could also glue the hoses in.
Step 3: Assemble outlets and drains for the aquariums
The outlets are also mounted with the air nipple. These are located on the waste water pipe, usually in such a way that they have the shortest route to the respective aquarium. The number of outputs depends on the air lift to be supplied. The assembly of the air nipples is the same as that of the air supply.
Step 4: Connecting the outlets to the air lifters
Silicone hoses are now routed from the mounted outlets to the respective aquariums and connected to the air lifters. In between, shut-off valves should be installed. These have the option of either shutting off the air completely, or just regulating the air supply accordingly. Most of the time you can regulate this steplessly, since there is a ball valve inside.
Step 5: Commissioning and functional test
Basically you've already done that and you can turn on the compressor. Now you have to check whether air is arriving in all pools and adjust it if necessary. It can also happen that the air is not enough. Then you have too little power and flow rate at the compressor. If you have too much, the compressors can be infinitely adjusted. When starting up for the first time, it may take some time until pressure has built up in the collecting tube or the pressure cell.
Compressor selection
Compressors come in different designs and sizes. In addition, it is of course crucial which delivery lines they bring. For the aquarium area with a few tanks, of course, you don't use a workshop compressor, but use smaller devices here. The decisive factor is not necessarily the power consumption in watts, but rather the flow rate in liters per hour. Models with 1500 liters per hour are certainly the larger ones. An average of 600 l/h will usually be sufficient. Depends of course on the number of aquariums. In addition, factors such as the distance from the aquarium and the loss of air along the way also play a role. The size of the air lifter is also crucial. With nano aquariums, you usually don't need more than 80 liters per hour for a tank, although if you want to supply larger systems with air, you can quickly add up to 500 liters per hour. Depending on the air consumption, you should also calculate the compressor power.
For large pools there are even air lifters which can deliver up to 2200 l/h. A compressor capacity of at least 1100 l/h is then required to produce sufficient air. Certainly not necessary in a breeding facility.
We also recommend taking a certain reserve into account. It is better to have too much air and then throttle it accordingly than too little air. You can always retrofit a second or additional compressor.
How many aquariums can I connect to one system / filter?
You should now be able to answer this question yourself. Basically, there are no upper limits as far as the number of aquariums that can be connected to an air socket is concerned. Nevertheless, you have to consider whether you should not isolate the systems. We would recommend that you take one aerosol can per aquarium shelf. This is quite flexible.
| # | Preview | Products | Rating | Price | |
|---|---|---|---|---|---|
| 1 |  | Eheim 3702010 air pump air pump adjustable | 35,95 EUR | View product | |
| 2 |  | Tetra APS 100 aquarium air pump - quiet membrane pump for aquariums from 50-100 L, black | 12,09 EUR | View product | |
| 3 |  | FEDOUR 3W quiet aquarium air pump, 300L / H oxygen pump powerful aerator for aquariums ... | 16,97 EUR | View product |
How much does a filter system with pressure cell and air lifter cost?
Here it all depends on whether you build everything yourself or whether you go to a specialist dealer. Pressure cans can be bought ready-made, but this can quickly add up to €50 and more. You can usually build it yourself for half that.
You also need a compressor, which is usually around €50.
The individual air lifters cost around 10 euros if you buy them ready-made or you can build them yourself and save almost half. Then only the silicone hose and the shut-off valves are needed. In addition, you still have to factor in the Hamburg filter mats. Here you can also buy large mats and then cut them accordingly.
If you only have two aquariums, this purchase will not be worthwhile from a financial point of view. With 10 or more pools, however, yes. Here you can filter 200 pools for around 10 euros.
Apart from the costs, with such a system you are not only flexible, but also achieve an excellent filter performance. Maintenance is also very easy. You don't have to do much with the compressors and the mat filters can be cleaned under running water like a normal filter.
If you have any questions, you can ask them in our forum